Rebody 250 California build thread for dummies

Pond

Zorg Guru (III)
British Zeds
Joined
Dec 26, 2016
Points
144
Location
Spaldingski, Lincs
Model of Z
Z3 project
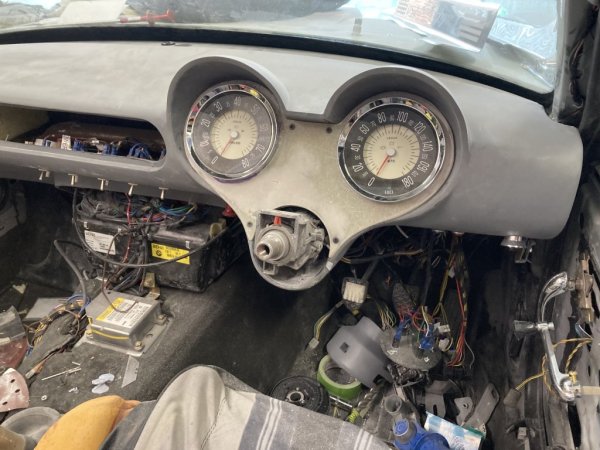
The wrinkle paint is a bit hard to get right, as Pingu was told by Ian at the Nottingham show you need to build up a thick coat by adding a few layers then before it Drys you heat it gently with a heat gun ,it eventually starts to crinkle you then just follow the crinkles with the heat gun and hope you don’t heat it too much before it blister. It take a bit of practice, I painted my dash 3 times before I was happy with it. I seems to react if areas are filled with body filler I think it must heat up at different speeds but if you go steady it seems to work.
I think my car was probably the other car Pingu saw at Nottingham, the Grey one.
I have practiced loads with the wrinkle paint. I have found it best NOT to build it up too much, just three fairly light coats. I have experimented with using a heat gun and a hairdryer. Heat gun is the way forward, as although a hairdryer is less aggressive, it only dries the very top 'layer' so the paint is still wet underneath and takes an age to dry. It also seems to give a different 'effect'.

I have used etch primer on everything I have painted so far, which should negate any problems with different surfaces.

My best practice piece was letting it dry naturally in the May sun. Unfortunately that is not reliable and there is a massive chance an insect (or several) will land on it whilst still wet.
20250524_160535.jpg
20250524_160714.jpg
20250524_161127.jpg
 
Last edited:

Rich355

Regular Member
Joined
Oct 19, 2021
Points
9
I could never manage to get it to crinkle when I let it dry naturally, but never tried putting it out in the sun, it does take a 24hours to go hard, if you get even a small defective area you need to do the whole area again you can’t easily patch it it in. It does seem to a tough enough surface when fully dried
 

Rich355

Regular Member
Joined
Oct 19, 2021
Points
9
I am not sure if you noticed but a few of us have made a separate surround for the Speedo / tachometer which allows you to remove the clocks and warning lights without removing the whole dash it also gives you a bit of access to behind the dash, I must admit I have had to remove the whole dash several times and its no fun to do. I have used the removable clock section several time chasing electrical gremlins and rattles and it makes it a lot easier.
Also I if you are using the push / Pull cables to control the heater you can cut a small rectangular removable panel around the pull push controls this means you can remove the dash without having to disconnect the three control cables.
 

Attachments

Pond

Zorg Guru (III)
British Zeds
Joined
Dec 26, 2016
Points
144
Location
Spaldingski, Lincs
Model of Z
Z3 project
I have been mostly pre-wiring my new dash in the last couple of days! :)
I needed to test my wiring, so I tested the pretty gauge lights first (as they are interesting).
I had a small problem with one bulb holder, but it was quite simple to 'adjust'.
20250530_214358.jpg
 

Pingu

Zorg Guru (III)
3rd Party Trader
Joined
Dec 8, 2011
Points
145
I am not sure if you noticed but a few of us have made a separate surround for the Speedo / tachometer which allows you to remove the clocks and warning lights without removing the whole dash it also gives you a bit of access to behind the dash, I must admit I have had to remove the whole dash several times and its no fun to do. I have used the removable clock section several time chasing electrical gremlins and rattles and it makes it a lot easier.
Also I if you are using the push / Pull cables to control the heater you can cut a small rectangular removable panel around the pull push controls this means you can remove the dash without having to disconnect the three control cables.
THAT is a top tip.

I wish that I had done it. In fact, I shall add it to the list of things that I'd like to do.

Trying to do anything to the clocks on my car needs four elbows and seventeen fingers on each arm.
 

Pond

Zorg Guru (III)
British Zeds
Joined
Dec 26, 2016
Points
144
Location
Spaldingski, Lincs
Model of Z
Z3 project
THAT is a top tip.

I wish that I had done it. In fact, I shall add it to the list of things that I'd like to do.

Trying to do anything to the clocks on my car needs four elbows and seventeen fingers on each arm.
I agree it is, however, I will leave mine as is and have to struggle as I can't bear the thought of 'panels' in the dash.
I have hopefully made it as easy as possible to remove the entire dash if and when needed. It's the heating 'cables' that are the only major headache TBH (I hope).
I have been trying to think of a way to 'join' the cables just inside the dash to release them if needed. I haven't found anything reliable enough yet.
 

Pond

Zorg Guru (III)
British Zeds
Joined
Dec 26, 2016
Points
144
Location
Spaldingski, Lincs
Model of Z
Z3 project
One thing I have noticed whilst checking my instrument wiring is that ANY feed to the speedo (even just the illumination feed) lights up the odometer figures. It isn't just the backlight on the LCD screen, the numbers power up in black aswell. Doesn't seem right to me. I shall be asking John at ETB at some stage.
 

Pingu

Zorg Guru (III)
3rd Party Trader
Joined
Dec 8, 2011
Points
145
One thing I have noticed whilst checking my instrument wiring is that ANY feed to the speedo (even just the illumination feed) lights up the odometer figures. It isn't just the backlight on the LCD screen, the numbers power up in black aswell. Doesn't seem right to me. I shall be asking John at ETB at some stage.
Your dash lights seem very bright. Perhaps they are so bright the light is being bounced all over the inside of the instrument.

Perhaps try using a variable resistor to change the brilliance, then either use a variable resistor or use a fixed resistor of the required value.

My dashboard lights are not as bright as yours...

View: https://youtu.be/N06kk5qxFNk?si=LBro7WnVjnpENDrJ&t=380
 

Pond

Zorg Guru (III)
British Zeds
Joined
Dec 26, 2016
Points
144
Location
Spaldingski, Lincs
Model of Z
Z3 project
Your dash lights seem very bright.
They're not. It's just the way the phone picked them up on the camera. They are standard ETB (VDO) gauges with standard bulbs. The resistor coil in the Z3 light switch dimmer will adjust them anyway. I am lucky to have one that hasn't crumbled to pieces. ;)
 

Pond

Zorg Guru (III)
British Zeds
Joined
Dec 26, 2016
Points
144
Location
Spaldingski, Lincs
Model of Z
Z3 project
All painted and ready to come back to me on Tuesday!
It was hard to see the finite details but it looks good from the few minutes I spent with it in the booth under lights.
The paint finish looks excellent with no orange peel that I could detect. It's VERY shiny!
The bodyshop treated and painted the bottom of the Z3 sills with stonechip and matt black paint, which was nice, as I was expecting to do that myself.
They have aligned the offside swage line correctly, which was something I couldn't do. All in all a very good job by the look of it.
Back to the hard work next week for me then!
20250606_120327.jpg
20250606_120248.jpg
20250606_120301.jpg
 

Jezza

Zorg Addict
Joined
Sep 28, 2016
Points
50
All painted and ready to come back to me on Tuesday!
It was hard to see the finite details but it looks good from the few minutes I spent with it in the booth under lights.
The paint finish looks excellent with no orange peel that I could detect. It's VERY shiny!
The bodyshop treated and painted the bottom of the Z3 sills with stonechip and matt black paint, which was nice, as I was expecting to do that myself.
They have aligned the offside swage line correctly, which was something I couldn't do. All in all a very good job by the look of it.
Back to the hard work next week for me then! View attachment 338547View attachment 338549View attachment 338551
Looks fantastic Andy!
 

Jam03

Zorg Guru (III)
Supporter
British Zeds
Joined
Feb 21, 2022
Points
139
Location
Surrey
Model of Z
2.2i
Looks great. Can’t wait to see it finished.
 

Pond

Zorg Guru (III)
British Zeds
Joined
Dec 26, 2016
Points
144
Location
Spaldingski, Lincs
Model of Z
Z3 project
Nice panel alignment with even gaps all around, that's hard. :thumbsup:
I got them to as close as I possibly could, then went around the whole car and stuck masking tape (with instructions in permanent marker) on ALL the areas I wasn't happy with.
The bodyshop owner looked at me like I was mental!
He later agreed it was the easiest way to make sure they didn't miss anything, though.
There was quite a bit of fine filler and blending of filler required to get everything 'proper', which they have done very well IMO. I did tell him from the outset that I didn't want 'OK', I wanted perfection (as far as is possible) or not to bother.
I think he charged me a bit more money cos he thought I was going to be a 'difficult customer' but so be it.
 
Top