Rebody Mittaws 250 SWB Coupe Build

Yes i was looking for barchetta originally but couldnt the code. This looked darker on the colour chart but im happy with it. I could go a shade darker but red is a funny colour as it can go orange or pink very quickly. I'll stick with this i think. Will show off the chrome nicely. Now leaving this 3 months to harden and better weather to finish off in the makeshift operating theatre.

Have a good Christmas all
You should have said.....I have the codes for both barchetta colours. Mine is Barchetta 2, the other is a more classic red.

Out of interest, how do you extract the 'fumes' from the space?
 
Thanks for the offer I had some codes but the shop struggled to match..i wasnt sure about true manifacturer codes anyhow as its not a replica. Im making my own car and own colours so to speak

As for the unit I used very big fans £200 each) and filters at the front of the unit and dropped the doors down 3/4 so they sucked the air out. I also had filters between the fans drawing air in from the negative pressure of the fans. Not perfect by any means but it did the job while wearing all PPE.

Cut my cloth to suit but aslo learnt a new skill.
 
Ok, winter break over and back to it

20260214_085654.webp

20260221_090646.webp


I'm happy with the first coat of paint. its survived the winter nicely in the unit and the colour has darkened slightly with drying so its not quite in your face red now, which I prefer. No cracks but plenty of pin holes to fill, mainly on the roof and wings where i did so much work. Second and final coat planned for end of March so lots of wet flatting with 600 grit now

I did notice last year though that there were some deep cracks in the fibreglass around the rear offside wheelarch which when painted are very evident. These needed grinding out and sorting. Just in the process of doing this. Didn't want to do it really but its best to do it now than regret it later.

20260227_111917.webp


While the rear window is out I'm taking the opportunity to build a fibreglass rear shelf panel which I will upholster. I just need a simple structure from the fibreglass so nothing complicated. I've covered the soundproofing matting with very low tact masking tape (finally found a use for the useless stuff). This gives me a good release from the matting.

20260222_100653.webp

20260222_104553.webp


I've then covered that in packaging tape as fibreglass doesnt stick to that very well.

20260222_113000.webp


Then ive given that a good covering of mould release wax. The packaging tape takes the wax really well and between them both make releasing the fibreglass panel relatively easy.

20260227_111642.webp


Fibreglass laid this morning and will now leave for a couple of days to harden before removing and strengthing in places and snoothing over for a thin layet of foam and covering. Ive started working on the inner skin too so i have something to upholster against on the rear quarters. It looks messier than it actually is. The lighting is not doing me any favours in the picture

Good to be back at it and welcoming the evenings getting lighter!! I hope everyone else is enjoying their builds/ cars
 
Last edited:
Good job.

I haven't done anything to mine for a few days. Bah! Her in-doors is busy painting walls in the house so I don't feel comfortable going out to 'play' in the garage while she's working . . .

. . . so I'm sat here in the office pretending to be doing office work.:ymdevil:
 
Good job.

I haven't done anything to mine for a few days. Bah! Her in-doors is busy painting walls in the house so I don't feel comfortable going out to 'play' in the garage while she's working . . .

. . . so I'm sat here in the office pretending to be doing office work.:ymdevil:

Uncharacteristically i was ushered out today to play... hope yours is coming along nicely
 
Last few weeks have been busy. Previous paint flatted to give a bind for the new coat and some areas of bodywork improved.

20260327_111944.webp


Good few coats of new paint on it all and left 14 days to harden. Colour looks good with the red base underneath rather than the grey primer.

20260328_130453.webp

I've used a 2k solid gloss paint so no clear coat needed over the top. Had a couple of runs which are easy to flat back with it being solid gloss. Now in the process of flatting everything back with some 1200 grit to remove the orange peel effect thats occurred.

It's taking quite some time as I'm doing it all by hand. I used a machine polisher initially to flat back but it feels too aggressive with 1200 grit on all the curved bodywork.

20260409_193202.webp


Next will be 3000 grit, 6000 grit, clay bar and polish up, then a few small spots that need touch up spraying/blending in. I've had a test polish on one wing and the colour comes up really nicely ...Just the rest to do....its just all about time now...then to put it all back together again.
 
Oh that's gonna look the dog's doodahs.

Wow. 6000.

I won't go down as far as 6000 grit. Too much rubbing. Maybe 2500 is the finest I'll use then switch to G3 compound and the machine.
 
Oh that's gonna look the dog's doodahs.

Wow. 6000.

I won't go down as far as 6000 grit. Too much rubbing. Maybe 2500 is the finest I'll use then switch to G3 compound and the machine.

Thanks, its starting to become a balance between obsession and insanity.

Ive tested that G3 compound and its very good. Just watch out for the pad you're using and make sure the paint is fully cured as the pads were generating too many swirl marks for me in what I'd cut down too. I wasnt sure if it was the surface not fully cured at 14 days or the polishing pad too abrassive. I'm going to avoid the pads and just use the wool ones for polishing up.
 
I wasnt sure if it was the surface not fully cured at 14 days
When I had mine painted last year (obviously didn't do it myself) I could smell paint 'fumes' in my garage for about a month. It was mid summer so warm too and I had plenty of ventilation. My bodyshop told me not to ,put any 'products' (polish, wax etc) on the paint for at least six months.

It probably depends on many things but new paint seems to be very fragile for quite a long time, which leads me to think it takes that long to fully cure/ harden..

Mine does have a clear coat BTW.
 
My bodyshop told me not to ,put any 'products' (polish, wax etc) on the paint for at least six months.

Yes. If it's a pro high gloss paint job then don't touch it for yonks. I suppose modern paints with hardner aren't as fragile as the enamel of the old days but still, if its a pro paint job then I wouldn't touch it.

But I'm not a pro so orange peel and the odd run need flatting back a bit
 
I've made a better spray environment for painting this weekend. I've created independent booths for spraying
using the gazebos with sides to control the environment. I've used patio heaters to create a warmer controlled environment as well as extractor fans.

20260418_141419.jpg


Got a much better finish this time.

20260419_131102.webp
20260419_131112.webp
20260419_140844.webp


Now to leave it for a few weeks to cure before cut and polish, and rebuild time.

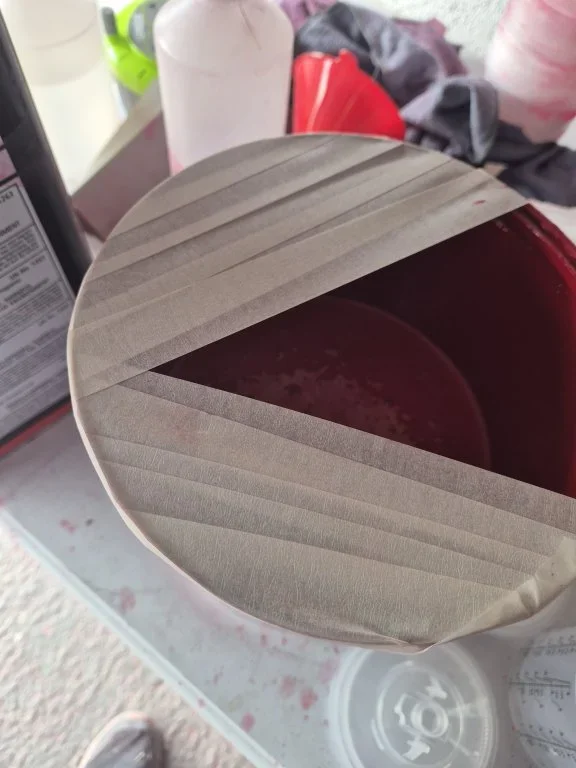
Also TOP TIP for pouring the paint from big can. I couldn't get a pouring lid for 5litre paint tin so used masking tape to create as controlled pouring environment. I was sceptical at first but it really works.

20260418_141310.jpg
 

Attachments

  • 20260418_141310.webp
    20260418_141310.webp
    41.3 KB · Views: 376
I appreciate that I would do a better preparation job than a professional, as I could spend 10 times, or 100 times more time getting it closer to perfection, but there is no way I'd attempt the actual spraying.

Fair play to you, and best of luck.

If it were me, it would be at least 20 coats, as 19 would be practice goes :) .
 
I appreciate that I would do a better preparation job than a professional, as I could spend 10 times, or 100 times more time getting it closer to perfection, but there is no way I'd attempt the actual spraying.

Fair play to you, and best of luck.

If it were me, it would be at least 20 coats, as 19 would be practice goes :) .

Thanks, 100% agree. I could have kept going on the prep but i have to balance that and finishing the thing! Spraying was daunting at first. The first layer was good but just exposed lots of prep deficiencies, the second coat was a nightmare, lots of drips, runs and orange peel. Which on reflection has taught me how to fix things which is good if not frustrating. This last session worked so much better. Is it perfect..no, am i proud of what ive achieved..100%. Ill bring it in over the winter and do any touch ups next spring. 2026 is for enjoying it lol. Frustrating now sat on my hands waiting for it to cure....time to get things done around the house / grout the patio and earn some brownie points to spend on a weekend of polishing it up lol.
 
Thanks, 100% agree. I could have kept going on the prep but i have to balance that and finishing the thing! Spraying was daunting at first. The first layer was good but just exposed lots of prep deficiencies, the second coat was a nightmare, lots of drips, runs and orange peel. Which on reflection has taught me how to fix things which is good if not frustrating. This last session worked so much better. Is it perfect..no, am i proud of what ive achieved..100%. Ill bring it in over the winter and do any touch ups next spring. 2026 is for enjoying it lol. Frustrating now sat on my hands waiting for it to cure....time to get things done around the house / grout the patio and earn some brownie points to spend on a weekend of polishing it up lol.
You should be proud. I have the utmost respect for doing a job like this yourself. I can turn my hand to most things and generally do a reasonable job. But there is no way in hell I would attempt to paint a car that I have spent many hours building (or any car for that matter).

I was talking to a chap yesterday who was telling me about how he painted his car himself. He did it with rattle cans!!
The car wasn't there but I instantly had a vision of what it must look like. The vision was not good.
 
Long weekend of cutting the paint so far. Its been a huge learning curve this week and roller coaster of frustrstion to elation. The paint has taken a lot of cutting back to get nice flat surfaces on the front section. Ive worked througb the grits stopping at 3,000 for now and then onto G3 cutting polish.

20260502_121540.jpg


I worked through the grits to 6,000 originally but its really hard to see the scratches from the previous grade until its buffed up so Im stopping at 3000 for now and will revist it later.

Buffing up exposes all the previous sanding/swirl marks. From a distance it looks a nice shiny car and looks fine but for me I want the swirls and scratches gone, but I also want to enjoy the car this summer. So tactic is get it all buffed up and live with the imperfections for now. I'll finish building the car and then tackle each panel one by one later otherwise ill be here months rather than enjoying it for a while. I can take it back panel at a time and get it right when i have more time.

20260503_135613.jpg


There are also still some areas where the paint needs touching up so ill finish the first cut and then got back and do some spot touch ups all in one go. There are several areas of the car that need to look better.

I'm happy with how the colour has come up too after it drys. Feels like a good solid 1960s style red paint.

20260503_135539.jpg


Fisrt time painting a car and I have learnt loads on the way. Its far fromwhere I want it but now I know how to paint it I can bring it in at anytime for spot repairs / finishing the detailing of the paint ....while enjoying it.

One more day of cutting and then install of lights and wiring up again.....and then put for a spin before getting on with the internal trim.

20260503_140626.webp
 
Hats off matey. Not something I would contemplate doing.
I have noticed quite a few 'micro scratches' in my paintwork, under harsh LED lights, just from putting towels on the wings to protect them when in the engine bay. I think solid colours show these up more, especially under hard lighting.
Yet most people who see my car comment on how good the paint job is, as you can't see the tiny scratches in daylight.

Basically....don't get too anal about it or you will never be happy and spend the rest of your life on the paintwork. No-one else will ever notice.

On another subject......It looks like you have the same wheels as me (Grassbanks type with splined hub adapters??). If they are, keep an eye on them when you use the car as mine keep working slightly loose for a reason I can't get to the bottom of.
 
Cheers, 100%. im in the camp thats its good enough for now and ill play with it later. Red is a nightmare isnt it.
 
First test run today went well. Some small snags to sort out and then I'll take it for a proper test run the weekend. I need to touch up the paint where I've knocked it when having to refit the doors...I'm not removing them ever again. But that will come later. I'm happy driving it with a bit of red primer on those bits as a still work in progress build. I'm happy.

20260518_172834 (1).webp
20260518_173055.webp


Next thing is to road test properly but one question do you think my driving / fog lights are too small. Sometimes I think they are ok, but sometimes I think they should be just ever so slightly bigger.

And an obligatory AI background one so it's not in an industrial estate

20260518_172859(1).webp


Roll on the Summer....and then all the internal upholstery etc...
 
First test run today went well. Some small snags to sort out and then I'll take it for a proper test run the weekend. I need to touch up the paint where I've knocked it when having to refit the doors...I'm not removing them ever again. But that will come later. I'm happy driving it with a bit of red primer on those bits as a still work in progress build. I'm happy.

View attachment 362945View attachment 362947

Next thing is to road test properly but one question do you think my driving / fog lights are too small. Sometimes I think they are ok, but sometimes I think they should be just ever so slightly bigger.

And an obligatory AI background one so it's not in an industrial estate

View attachment 362949

Roll on the Summer....and then all the internal upholstery etc...
I think your fog lights are a little small. I had difficulty finding some for mine. Ended up importing some from The Netherlands as CBS ones were smaller.
 
I think your fog lights are a little small. I had difficulty finding some for mine. Ended up importing some from The Netherlands as CBS ones were smaller.

Thanks, that helps a lot. I wasn't sure but had an inkling they were too small. I'll look for some larger ones.
 
Back
Top